How to Make a Desktop or Laptop Act Like a Router
Looking for a way to convert your
laptop or desktop into a wireless router? You may find yourself in a
situation where there isn’t a wireless router around for everyone to
connect to. If only one computer is connected to a cable or DSL modem,
you can convert that computer into a router or wireless router, if the
computer has a wireless card.
Before we talk about the setup process, it’s important to know the
requirements. The main requirement is that the computer has to have at
least two network interfaces installed on the system. You can either
have two network cards or one network card and a wireless card. If you
only have one network interface, you can’t convert your computer into a
router.
Also, on Windows computers, the process of setting up this router functionality is called Internet Connection Sharing. However, in order to have clients connect to the host computer wirelessly, you also have to setup an ad-hoc wireless network that connects to the Internet using the other network interface installed on the machine.
For a better understanding, here are the tasks we need to complete in order to make your computer into a wireless router:
Step 1: Enable Internet Connection Sharing on the Local Area Connection interface
Step 2: Create a new ad-hoc wireless network
Step 3: Connect to the new wireless network on the host computer
Step 4: Connect each client to the new ad-hoc wireless network

Now right-click on Local Area Connection and choose Properties. Note that on some other sites state that you should right-click on Wireless Network Connection, but this would mean the wireless connection would be shared and all clients would have to connect via Ethernet. It’s a lot more complicated and I’ve never even been able to get it to work, so stick with Local Area Connection if you want to make your life easier.

Click on the Sharing tab and there is really only one box you can check: Allow other network users to connect through this computer’s Internet connection.

When you check the box, the dropdown box under Home networking connection will become enabled. Here you want to select the wireless network connection for your wireless card.

If you have more than one listed, it could be that one of them is a virtual adapter. Make sure to not choose that one. You can tell if there is a virtual adapter when you look at all the adapters after clicking Change adapter settings at the beginning of this article.

Click OK and close out of the Properties window. Now the LAN connection will be shared and we can move on to step 2.

Now scroll down and click on Setup a wireless ad hoc (computer-to-computer) network.

Click next and then give your network a name. This name will be the SSID for the network that other users will see on their computers. For Security type, choose None and leave the Security key box blank.

Also, make sure to check the Save this network box. Click Next and it will setup the new wireless network and tell you that it’s ready to use. Click Close and move on to Step 3.

As you can see, my network is called Shared and the status is Waiting for users. This means the host computer is already connected and is waiting for other users to connect. You can click on the network name and click Connect if the system didn’t connect automatically. Once another user connects, the status should change to Connected.

The only change you have to make on client machines is in Internet Explorer. Open IE and then click on the gear icon and choose Internet Options.

Click on the Connections tab and then click on LAN Settings at the bottom.

You want to go ahead and uncheck anything that is checked here. Automatically detect settings will most likely be checked, so make sure to uncheck this box.

Note that you should only follow this procedure on the client computers, not the host computer. At this point, you should be able to connect to the Internet from the client machine.

Now type in netsh winsock reset and press Enter. The command will complete and it’ll tell you to restart the computer.

If you’re still having issues connecting clients to the Internet, post your situation here and I will try to help. The process is a bit complicated, but if you can get it to work, it’s a great little way to connect multiple clients without additional software or hardware. Enjoy!
Also, on Windows computers, the process of setting up this router functionality is called Internet Connection Sharing. However, in order to have clients connect to the host computer wirelessly, you also have to setup an ad-hoc wireless network that connects to the Internet using the other network interface installed on the machine.
For a better understanding, here are the tasks we need to complete in order to make your computer into a wireless router:
Step 1: Enable Internet Connection Sharing on the Local Area Connection interface
Step 2: Create a new ad-hoc wireless network
Step 3: Connect to the new wireless network on the host computer
Step 4: Connect each client to the new ad-hoc wireless network
Step 1 – Enable ICS
To enable ICS in Windows, open the Control Panel and click on Network and Sharing Center. Make sure you are in icon view and not category view. Click on Change adapter settings in the left-hand menu.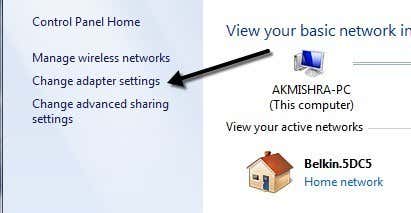
Now right-click on Local Area Connection and choose Properties. Note that on some other sites state that you should right-click on Wireless Network Connection, but this would mean the wireless connection would be shared and all clients would have to connect via Ethernet. It’s a lot more complicated and I’ve never even been able to get it to work, so stick with Local Area Connection if you want to make your life easier.

Click on the Sharing tab and there is really only one box you can check: Allow other network users to connect through this computer’s Internet connection.

When you check the box, the dropdown box under Home networking connection will become enabled. Here you want to select the wireless network connection for your wireless card.
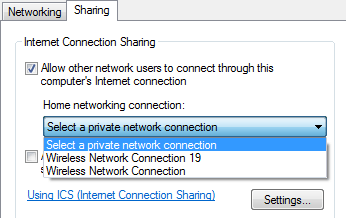
If you have more than one listed, it could be that one of them is a virtual adapter. Make sure to not choose that one. You can tell if there is a virtual adapter when you look at all the adapters after clicking Change adapter settings at the beginning of this article.
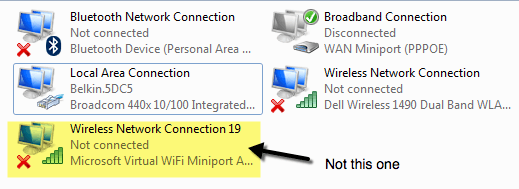
Click OK and close out of the Properties window. Now the LAN connection will be shared and we can move on to step 2.
Step 2 – Create Ad-Hoc Wireless Network
To create the ad-hoc wireless network that the client’s machines will connect to, we need to go back to Network and Sharing Center and click on Set up a new connection or network.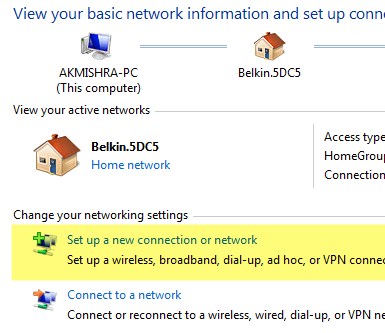
Now scroll down and click on Setup a wireless ad hoc (computer-to-computer) network.
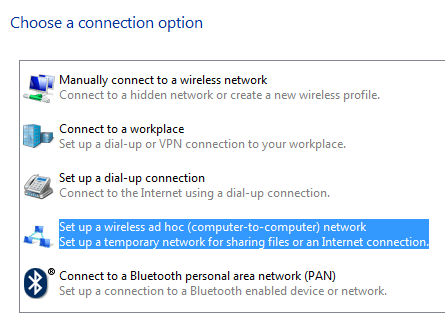
Click next and then give your network a name. This name will be the SSID for the network that other users will see on their computers. For Security type, choose None and leave the Security key box blank.
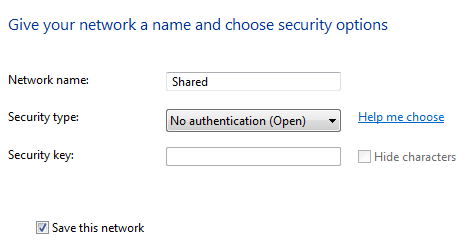
Also, make sure to check the Save this network box. Click Next and it will setup the new wireless network and tell you that it’s ready to use. Click Close and move on to Step 3.
Step 3 – Connect to Ad Hoc Network
Now that the new network has been set up, we need to make sure we are connected to it on the host computer. To do this, click on the network icon in the notification area of the taskbar.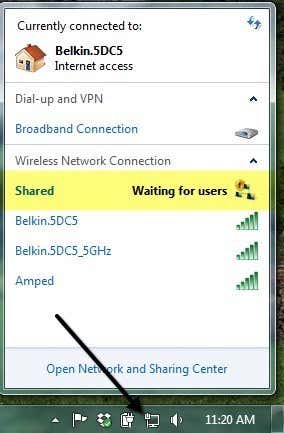
As you can see, my network is called Shared and the status is Waiting for users. This means the host computer is already connected and is waiting for other users to connect. You can click on the network name and click Connect if the system didn’t connect automatically. Once another user connects, the status should change to Connected.

Step 4 – Connect Clients
The last step is the easiest. Just go to a client machine and click on the network icon and click on the ad-hoc network name. You should connect automatically without any issues.The only change you have to make on client machines is in Internet Explorer. Open IE and then click on the gear icon and choose Internet Options.

Click on the Connections tab and then click on LAN Settings at the bottom.
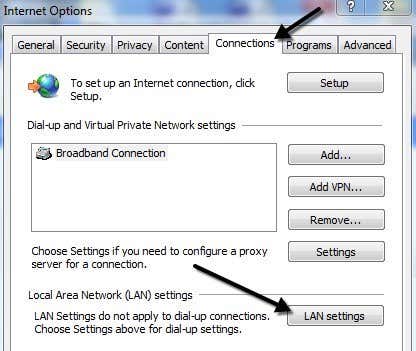
You want to go ahead and uncheck anything that is checked here. Automatically detect settings will most likely be checked, so make sure to uncheck this box.
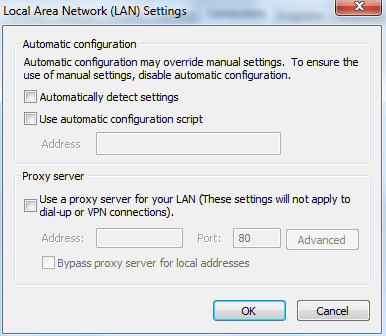
Note that you should only follow this procedure on the client computers, not the host computer. At this point, you should be able to connect to the Internet from the client machine.
Troubleshooting
If you are connected to the ad-hoc network, but are not able to access the Internet on the client machine, you can try a couple of troubleshooting tips.Reset Winsock
After playing around with ICS on several computers, there were times when I could open a command prompt and ping a website like Google.com, but could not access it via the web browser. If you’re having a similar issue, you can try resetting Winsock. To do this, open an administrative command prompt by clicking on Start, typing in cmd and then right-clicking on cmd and choose Run as Administrator.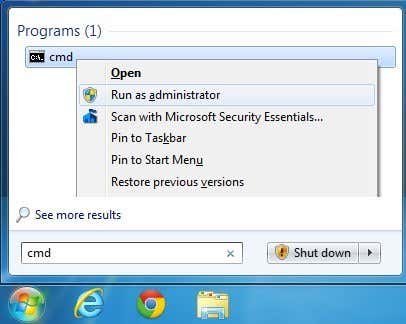
Now type in netsh winsock reset and press Enter. The command will complete and it’ll tell you to restart the computer.

If you’re still having issues connecting clients to the Internet, post your situation here and I will try to help. The process is a bit complicated, but if you can get it to work, it’s a great little way to connect multiple clients without additional software or hardware. Enjoy!
No comments:
Post a Comment